In our last article (if you missed it, you can find it here) we talked about #Benchy3D, the famous benchmark created by Swedish service and reseller Creative Tools in 2015, and about its purpose in troubleshooting 3D printed objects.
Today, we’ll be using this benchmark to detect the printing issues that should be avoided at all times to guarantee high quality prints.
FDM printing technology is generally responsible of uneven surfaces due to the layering of filament in thin layers. This staircase-effect is considered a normal output of this printing technology.

Our post-processing device 3DFinisher was developed for this exact reason: providing an effective remedy to the poor quality of 3DPrinted objects.
3DNextech’s device enables the fabrication by additive manufacturing of objects with characteristics comparable to those offered by traditional technologies.
Who wouldn’t want a print that looks like this?
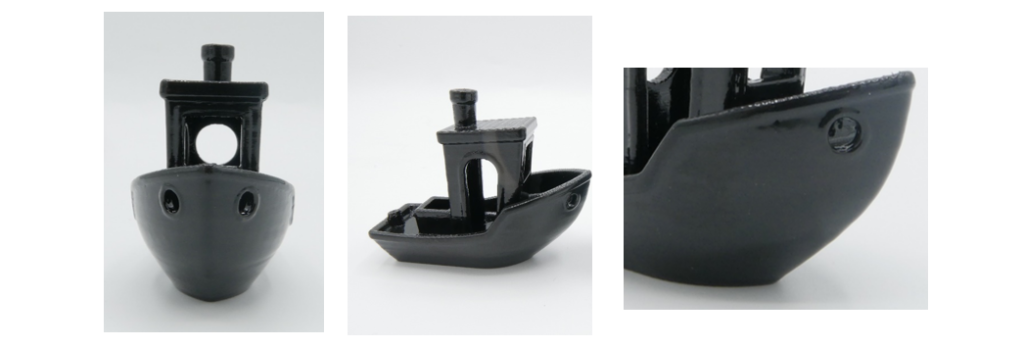
No visible layers, shiny and smooth. These results, however, require some precautions.
So, let’s see how to maximize the result of post-processing treatments.
For satisfying results, whatever the post-processing method used is, it’s important that 3d printed pieces meet minimum quality requirements. This would be a great (and necessary!) starting point.
In fact, even though post-processing treatments remove all imperfections caused by the overlapping of the layers and make surfaces perfectly smooth and compact (as well as waterproof in the case of 3DFinisher), they can’t take care of the issues that are caused by wrong set parameters or from printer malfunctions.
Post-processing devices such as 3DFinisher just can’t be used to fix mistakes caused by the misuse of our 3D-printer!
Then, what should parts look like before treatment?
Here are some images of what 3D printed objects should and should not look like to look good after an automatic post-processing treatment:
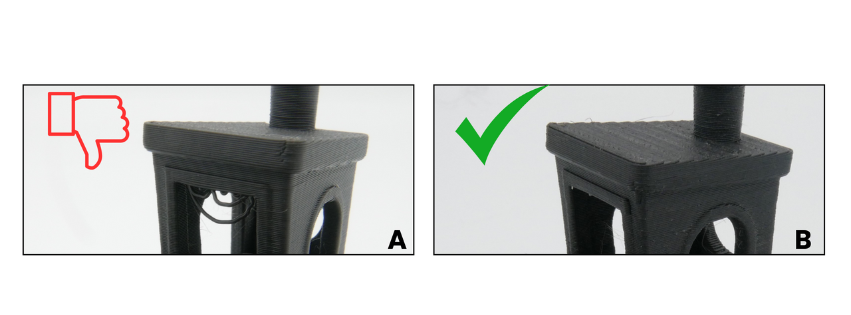
(A) Some defects show on the surface of the print. These are known as “zits”. Bigger ones are called “blobs”. These flaws are typically due to extra material that built up on the surface of the print.
(B) Layers show on the surface, but no zits can be seen.
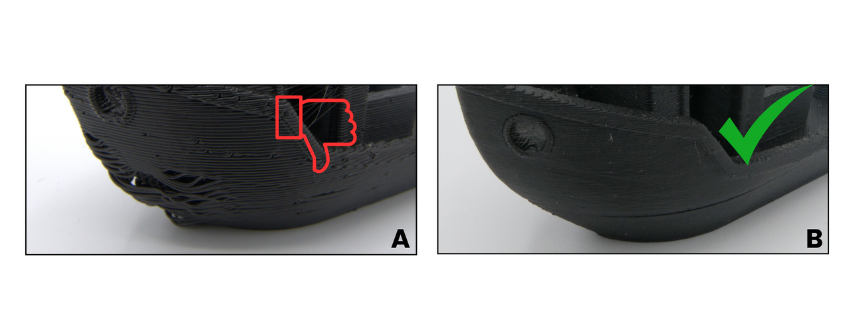
(A) During the printing phase the filament has collapsed in the overhanging sections. This problem is known as “poor bridging”.
(B) The overhanging surface has no sags and layers are firmly attached to each other.
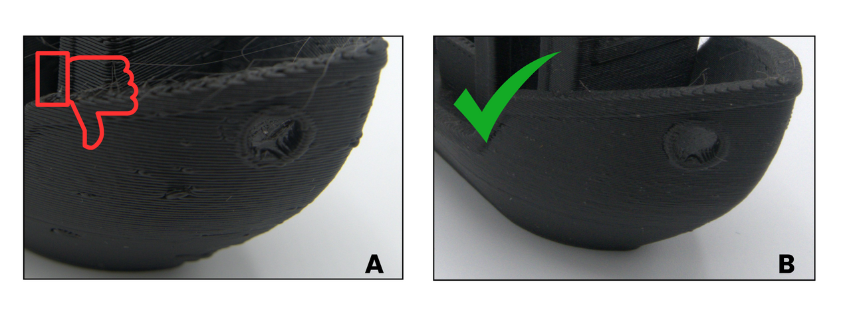
(A) The print shows holes where layers have not bonded one to the other.
(B) Uniform texture.
These are only some of the defects that may compromise the quality of your prints and that are difficult to fix recurring to post-processing.
Speeding up printing times to optimize lead times is often not a good idea. Especially when the quality of the final product is at stake!
In short, it’s always a good thing to keep an eye on the printing parameters selected and to pay attention to the proper functioning of the printer. A good finishing will make the final product perfect, but getting there can’t do without a good initial print.