
3D-printing can easily create components of numberless geometries, overcoming the limits of traditional subtractive technologies.
Arches, circles, roofs, and bridges are only some of the endless shapes that can be created. Shapes that in the past seemed impossible to realize, today are easily obtainable with a 3d printer.

But when pieces are particularly complicated, software is there to help.
Realizing overhanging and suspended surfaces may be tough due to the nature of the printing process. In fact, in FDM 3dprinting, layers are deposited one on top of another, and each of them sustains the following one. For this reason, suspended sections need an extra help from the software. This will insert specific structures- called “supports”- in the right spots, and these will help the printed layers to stay in place during the entire printing phase, when the filament is hot and prone to drip.
upport is often fundamental. But adding support inevitably results in longer printing and post-processing times and in an increased use of material. This also leads to increased costs. Not to mention how difficult removing supports may be and how easily prints can be damaged.
So, is it possible to avoid support and print solid pieces?
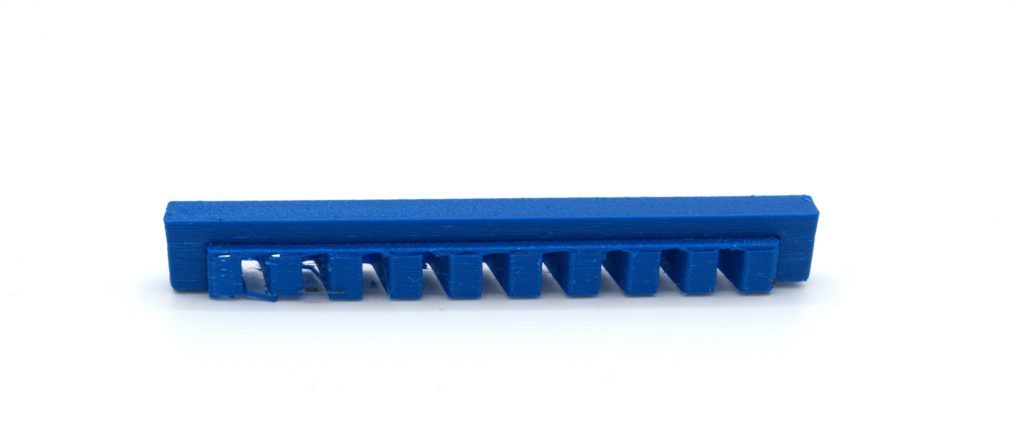
The answer is, yes, it’s possible. In fact, not all pieces require supports and some structures may be defined as “self-supporting”. These structures that hang between two separate standing points are called “bridges”.
What can we do to achieve perfect self- standing bridges?
The secret lays once again in the correct setting of the slicer’s parameters.
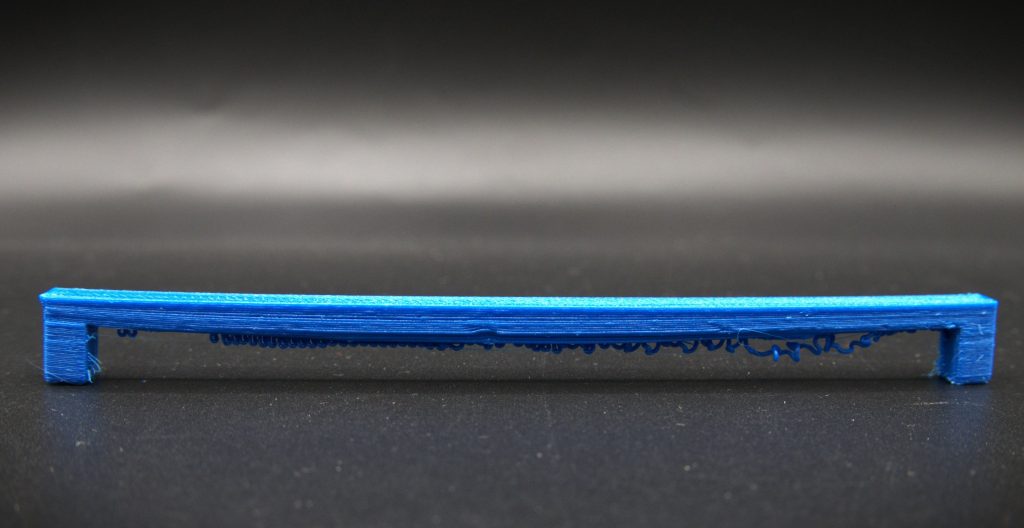
Whether long or short, our bridges will collapse disastrously, or show annoying imperfections, such as drooping and sagging, if some precautions are not adopted.
Knowing the causes of bad bridging can help setting the ideal parameters.
Drooping and sagging may be related to extremely high extrusion temperature, or to a lack of cooling of the filament, or even to an overflowing of the material during the printing.
That’s why we need to pay attention to the settings that control those factors.
Here are 3 tips for solid and drooping-proof bridges.
SET THE RIGHT TEMPERATURE
Setting the right temperature is vital for good prints and, as we’ve previously seen – read the article- poor bridging is just one of the issues associated with incorrectly configured parameters.
But let’s go back to our bridges. The reason you get saggy bridges is that the warm filament will struggle to solidify in time, drooping before the nozzle ends its trajectory between the two standing points.
There’s no need to say that finding the perfect temperature ahead of time is impossible. That just isn’t possible. The first thing to keep in mind is the type of material used for the print.
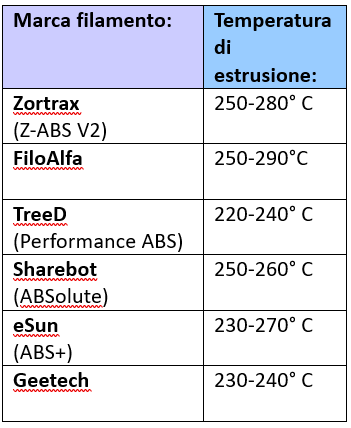
Here are some general guidelines on the recommended temperatures for some of the most commonly 3dprinted materials:

PLEASE NOTE: always check the temperature suggested by the manufacturer for each filament! Within the same material there may be different ideal extrusion temperatures, depending on the blend they’re made of.
This is an example of the variability of the parameters:
If you suspect that the sagging of the layer in your bridges is caused by an excessive temperature, try lowering it by 5°C first. If this still doesn’t solve the problem the issue may be caused by something else.
SET THE COOLING
Drooping can also be caused by the low cooling of the extruded filament.
For this reason, I recommend checking the settings of the fan of the printing chamber.
3Dprinters are in fact equipped with a cooling system that flows air onto the printed filament, allowing it to harden before the following layer is extruded.
Fan speed can be adjusted from the slicer. When you experience bad bridging, try increasing the fan speed, to achieve better ventilation.
CHECK THE EXTRUSION MULTIPLIER
Finally, the third aspect you need to take in consideration is the extrusion.
The setting responsible for the material extruded is called “extruder multiplier”. Its function is to control the flow of the print.
If too much material flows out of the nozzle, the filament will struggle to cool, and the layers will be heavier and will be more prone to collapse.
Again, if this is the cause, we need to proceed lowering the parameter by 5% at a time and to try different settings until reaching the ideal combination.
So, these are our 3 tips to optimize 3dprinted overhanging surfaces.
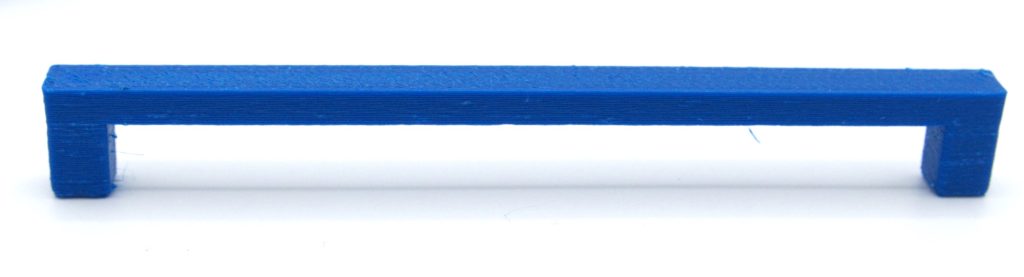
Finding the right setting may need some time and tests and attempts, but once spotted the right combination, you’ll be able to print solid bridges.
Finally, if no matter the precautions taken, the printer still can’t print long bridges, try adding a light support!